

Operation and Uses of a GPS
 The Global Positioning System (GPS), [littéralement] also known as Navstar, is the first global geolocation system to operate radio signals from a constellation of dedicated satellites. Established by the U.S. Department of Defense for military purposes in 1973, the system with 24 satellites was fully operational in 1995 and opened to civilian use in 2000.
The signals transmitted by satellites may be freely received and exploited by anyone. The user, whether on land,at sea or in the air, can know his position at any time and in any place on the surface or in the vicinity of the surface of the earth with unprecedented accuracy, as long as he is equipped with a GPS receiver and the software necessary for processing the information received.
The principle of operation is based on the trilateration of synchronized electromagnetic signals emitted by satellites. To ensure the accuracy of positioning, the GPS system uses sophisticated technologies: on-board atomic clocks, compensation of relativistic effects, installation of observation and synchronization stations. The calculated ground coordinates refer to the WGS 84 geodetic system.
In shipping, this electronic positioning instrument allows:
- to make the point instantly and possibly to transmit the coordinates to the emergency services,
- download a map where the part of the map you want,
- to follow a route prepared in advance whatever the climatic conditions and in particular in foggy weather and to visualize at any time its position on the screen in relation to the recorded route,
- to record its trace during movement and to memorize some remarkable crossing points, the Waypoints.
Whether on or off the trail, the controlled use of this device during a hike represents a saving of time and efficiency.
The use of GPS, however, implies knowing how to read an IGN map and knowing the use of a compass.
The criteria for choosing a GPS
In order to facilitate your choice, here are the essential characteristics of a good device:
Robustness and tightness. A GPS must be robust and waterproof. The case of a good device has a shock sheath that improves robustness as well as waterproofing. The tightness is indicated by the IPX index whose characteristics are detailed on the internet. Indices 5 and 6 allow the GPS to withstand water splashes and index 7 to immersion.
The quality of the screen. It is also necessary to take into account the size and definition of the screen. A large screen is of course more ergonomic but pay attention to the weight. We must therefore find the right compromise. The screen must be transflective, brighter in the sun and therefore easier to read. Anti-reflective treatment can also improve readability. Some models are equipped with touch screens, which provide in certain conditions a little more ergonomics.
The keyboard. On some models it is possible to handle the keyboard with gloves. This is an undeniable plus when it is cold for winter hikes.
Internal memory. The larger it is, the more maps can be stored. This is not an essential purchasing criterion from the moment it is possible to add additional memory in the form of a micro SD card.
Autonomy. Autonomy is variable with an average of 15h /day. It is interesting to have a GPS that accepts NiMHrechargeable batteries. Autonomy can be reduced by extreme temperatures. Under these conditions, prefer lithium batteries,as on DVA. For very long routes, it is advisable to resort to solar chargers or energy banks.
Some specific GPS are only intended to signal its position in case of absolute emergency,such as Argos beacons. You can bring it for extreme expeditions, cut off from all contact with human communities, such as north pole, anapurna …
Initial setting of your GPS
To be functional, the GPS must be properly configured and this configuration must be adapted to the nature of your shipment. It will be necessary to remove some unnecessary functions, possibly consuming battery or memory.
The setting described below is that of a GARMIN GPS. It goes without saying that you can adapt its settings to a GPS of another brand.
To get started, start by accessing the general settings:
GARMIN Path: Page —> Main Menu —> configuration —> enter
Then make the following settings:
Select the WAAS system. This system makes it possible to correct errors in GPS signals caused by ionospheric disturbances.
The choice of feed. Remember to indicate the type of batteries used, alkaline (commercial standard batteries), lithium (work at -30 ° C) or NiMH rechargeable.
The functions of the screen. Adjust the timer without forgetting to activate the energy saving.30 seconds is a good setting.
The characteristics of the mapping. Select the north to the top of the map as on a topographic map, disable automatic zooming. It is important to enable the type of card used so that it appears on the screen and disable other cards.
The trace-reading function. If you decided to track your planned plot without adding a record of your move, select "do not record the tracking log (or current path)".If you choose to record and display on the map the trace log then the trace of your movement will be added to the forecast plot on the screen in a different color. In this case, do not forget to stop recording at the end of the journey. Select an autosave with a normal interval.
Adjusting the position format. Prefer degrees, minutes seconds in the WGS84geodetic system.
The function of altimètrie. Enable automatic calibration,you won't have to do it in the field.
Using GPS when hiking
The best way to use a GPS is to follow a route that you have previously traced or imported on your computer.
This route is prepared by going to a map route tracing site such as http://www.visugpx.com or better with a software such as Basecamp from GARMIN or Land from TWONAV. The software generates a GPX file that is transferred into the GPS.
To search for the route in the GPS you must use a search key.
GARMIN path: Find —> traces —> path.
This key is also used to stop the navigation in progress or at the end of the journey.
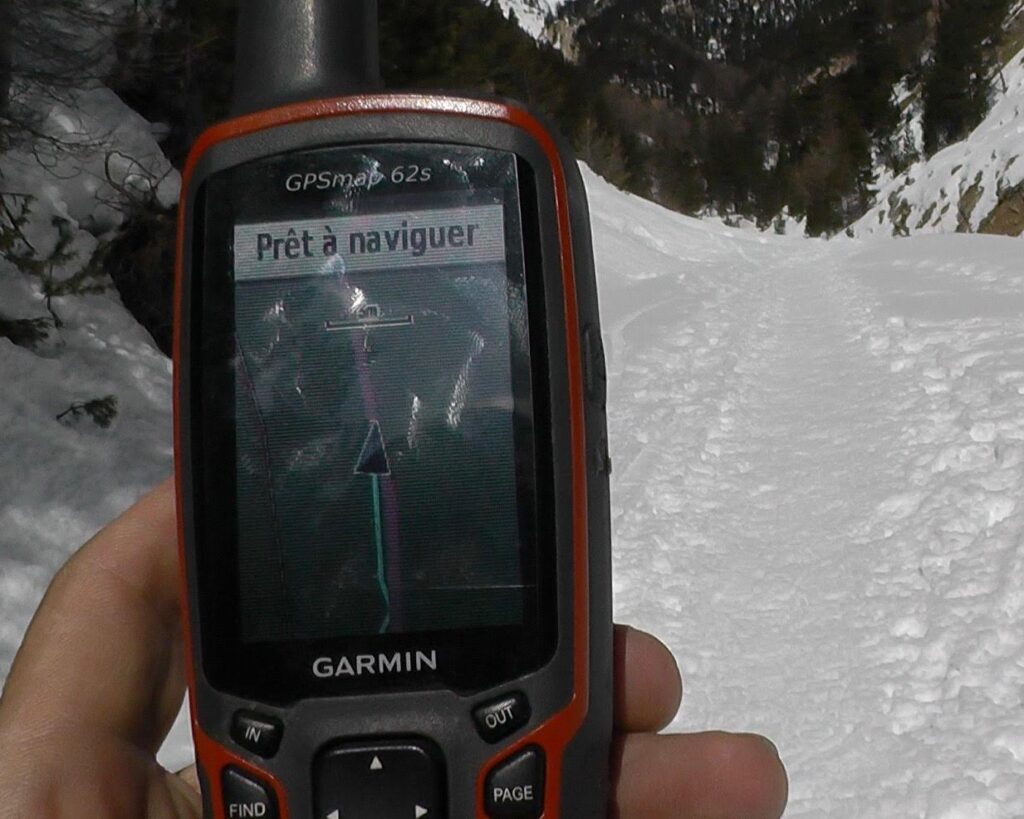
We visualize on the GPS screen whether on a map background or not the trace of the route and a position mark often represented by an arrow that indicates the place where we are. It is therefore enough to follow this trace on the ground. The arrow is oriented in the direction of displacement. When stationary, it takes a position perpendicular to the path. By car when you get closer to the route and if you have not opted for automatic zoom, you must think about reducing the value of the zoom so that it appears on the map especially if you are several hundred meters from the starting point.

In hiking, you can adjust the zoom by increasing it to its maximum value in order to accurately visualize the position and movement of the position mark relative to the path.
GARMIN path:"in"and"out"keys for zoom adjustment.
If, in the setting, we have oriented the map to the north towards the top of the screen it is important to know where it is located. At the very least, you have to know whether it is in front of you or behind you. You can use the compass of the GPS or better a compass with a pad to avoid changing the screen. This serves to anticipate changes of direction and to turn in the right direction. If the north is in front of you while holding the device in the place, a right turn on the screen remains in the same direction on the ground, but if it is behind you you will have to turn in the opposite direction, so left, unless you hold the device upside down.
It is interesting to record his trace during the displacement. This makes it possible to compare the recorded path where one actually went, called "current path" in GARMIN GPS against the"forecast plot". The recorded route takes into account any zigzags that must be carried out on very steep slopes and thus has a more precise value of the distance travelled.
Before the journey, check if the current plot or trail is on"save" and "show on map".
Page—> Main Menu—>Config—>Trace—>Trace Log – Save/View on Map.
At the end of the journey do not forget to stop recording the tracking log, otherwise the GPS will continue to record your movements.
Page—> Main Menu—>Config—>Trace—>Trace Log / Do Not Save.
To save the path made, go to:
Managing Paths—>The Current Path—>Save Path.
After recording the journey, the device then asks you if you want to erase the current path.
If your career is star-shaped, you have to answer"yes". This does not clear the journey record that you can retrieve on the computer, but it is cleared in the trace log so that it does not add to the next route. Answer"no"if your journey is spread over several days and you want it to be added to the following. You now know how to follow a forecast trail and record your movement in the field.
![]() For the first use, train on a small trail course that you know well and that you will have previously traced.
For the first use, train on a small trail course that you know well and that you will have previously traced.
The use of route tracing software
The choice of software
The two main software known on the market are Garmin's Basecamp and TWONAV's Land which offer substantially the same functions. The Basecamp software is free and can be downloaded from the GARMIN website. Both Basecamp and Land also have the advantage of having a 3Drepresentation.
These softwares have a directory to classify the journeys by classifying them in lists that are part of a folder and you can create as many lists and folders as you want.
There are also websites with free route tracking applications such as VisuGpx or Skitrack but the zoom is less efficient which makes you lose a little precision when tracking.
Getting started with Basecamp
If you want to buy a cartgraphic background,you have the possibility to download the part of map that interests you "Birds eye" for 19 €, but be careful, the area covered on a map at 25/1000 th is low. If you hike a lot it is better to buy a TOPOFRANCE card. The GARMIN maps at 1:25000 th take data from the IGN with an equidistance of 20m. You will have the choice between TOPO FRANCE PRO Montagne, TOPO FRANCE V4 PRO, or TOPO V4 PRO North-east, north-west, south-east, south-west. You can either download a map on the GARMIN site, or insert a micro SD card into the GPS.
If you haven't purchased a map,you can trace your route on the free Tracking Websites Visu GPX, Skitrack or Openrunner,and then transfer the GPX file to Basecamp. You will be able to classify the route in your directory before transferring it to the GPS. Even if you don't have a basemap, you'll see the plot and position markon the GPS screen, which is enough to complete the route. To have the map of the route, simply print it on the tracing site.
Draw a route directly on Basecamp with a map.
Before you start tracing your first journey, you will have to create a list in the"my collection" folder.
Right-click—>New List and then Rename List. Give it a name, for example "Summer Hikes".
Select the list and then use the "draw path" creation tool to trace and the "hand" to move the map.
Move the map with your hand and position yourself at the very beginning of the route.
Set the zoom to the maximum with the cursor (on 50m) and then start drawing with the creation tool.
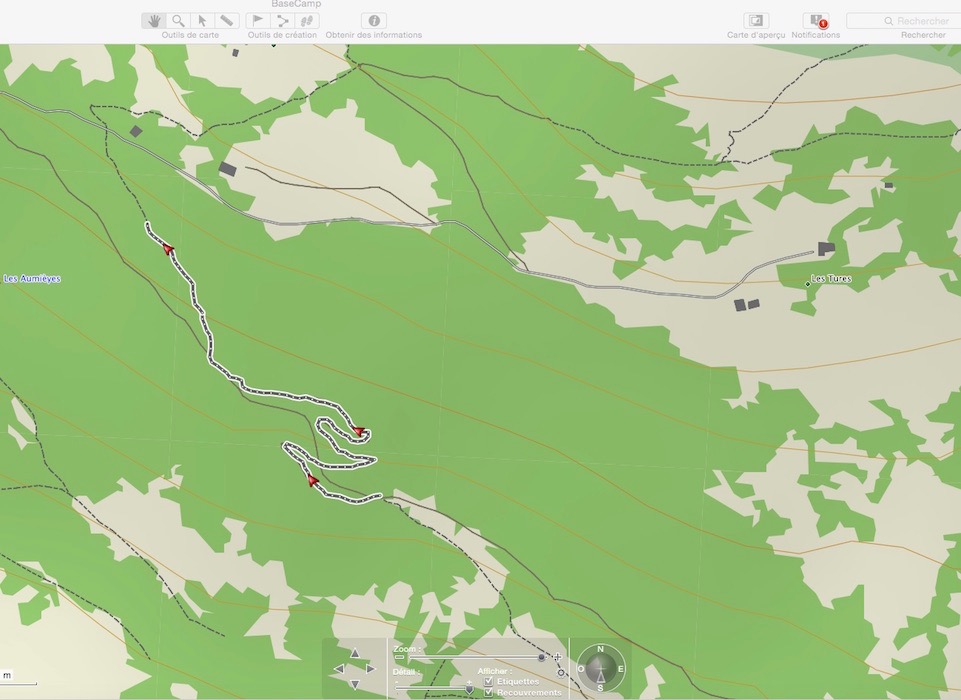
During tracing it will sometimes be necessary to decrease the zoom to see where you are before increasing it again in order to have as much accuracy as possible. The path is in the list you just created under the path name, just rename it. Your route is then finished.
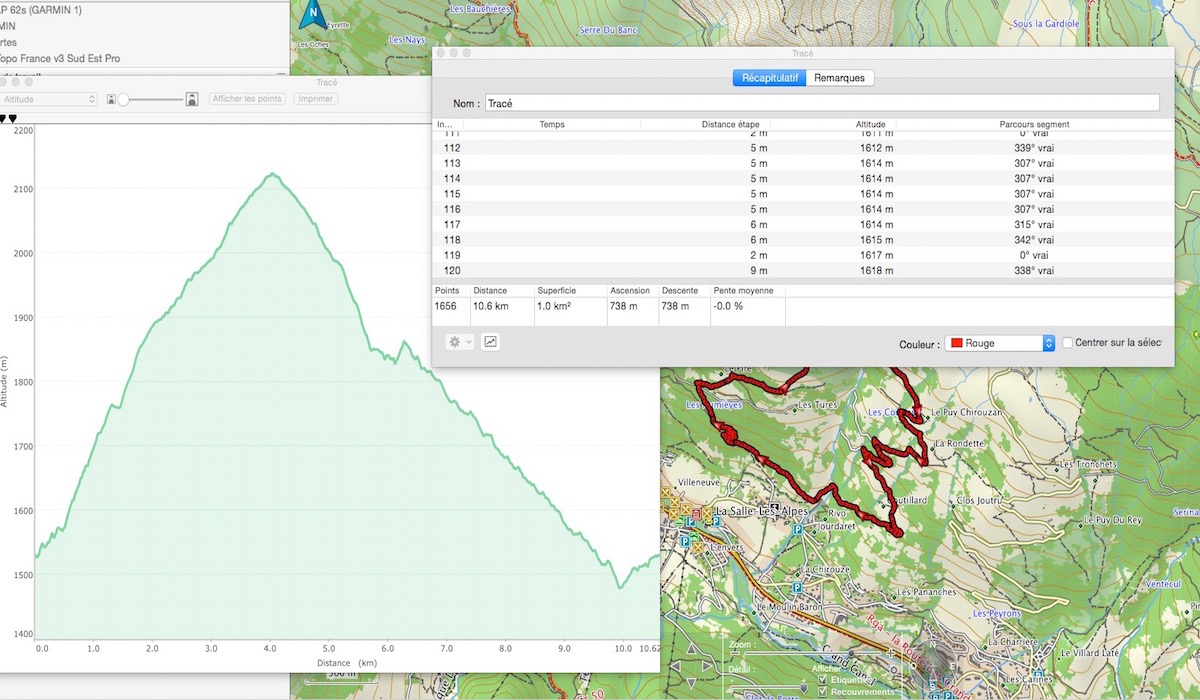
You can access the information table by clicking "i" on the toolbar provided that the path is selected or by double-clicking directly on it. You can change the color of the route on this board.
The table gives the positive and negative cumulative elevation differences as well as the distance and percentage of cumulative slope.
To have the profile simply click on the graph at the bottom of the table.
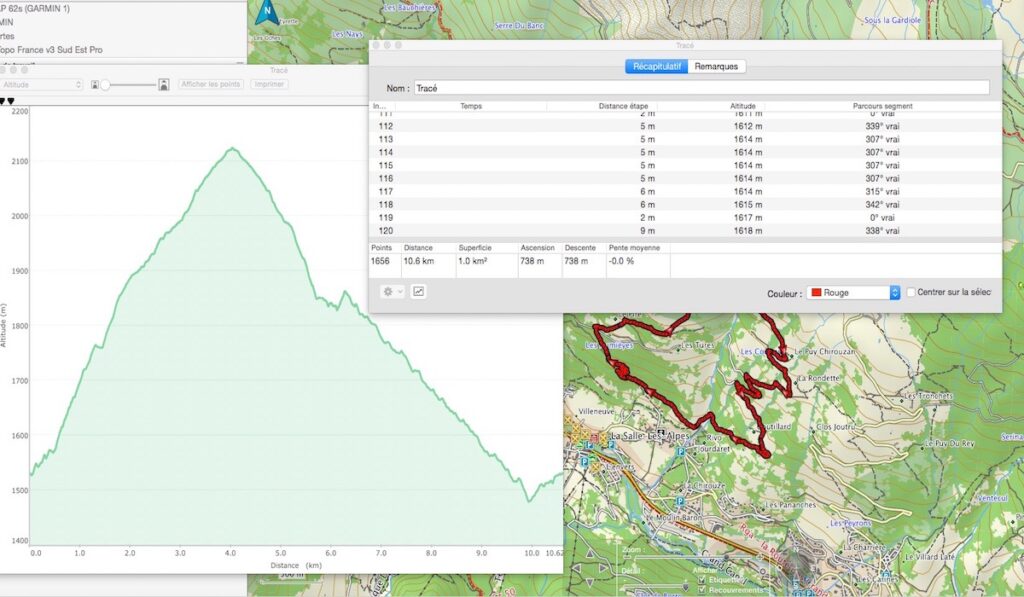
You can calculate the percentage of a slope between two points by positioning the red and blue sliders on the profile line.
The percentage of the slope section appears on the information table as well as the distance travelled and the difference in height between these two points. The sliders also indicate the percentage of slope at a given point.
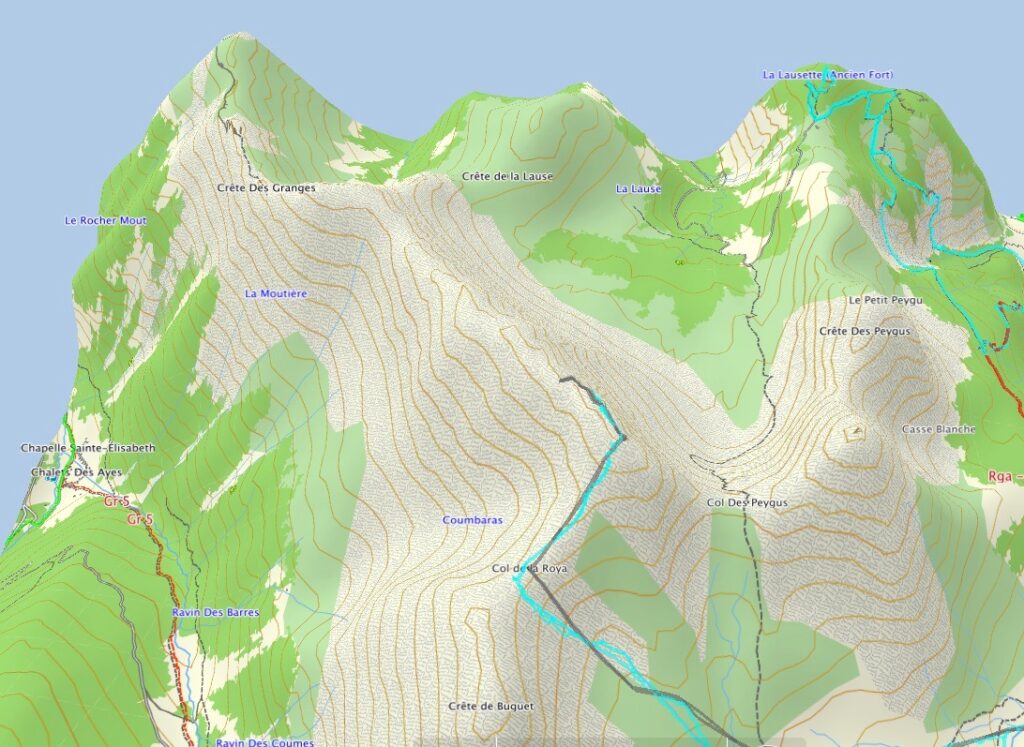
It's time to see your journey in 3D. Go to View and select the map in 3D.
You will immediately have a general representation of the relief. However, small bumps and small talwegs are not represented. For the latter nothing beats IGN mapping.
Once the course is completed, it is always possible to modify and compete with it by lengthening it for example. Just select the last point in the information table. The creation tool then becomes operational.
If you made an error during the drawing, it is possible by proceeding in the same way on the information board to remove the wrong points from the last one after selecting it.
To transfer your journey into the GPS, connect it to the PC by USB or bluetooth cable. To transfer the GPX file of this journey to the desktop.
It will then be possible to transfer it to http://www.skitrack.fr by clicking on the + symbol at the top in order to visualize your route on the IGN map.
The magnifying glass tool is used to obtain a higher zoom level than that obtained with the cursor.
The ruler tool is very interesting because it is used to measure the linear distance between several points and to determine the azimuths corresponding to the different directions of a journey.
It is sometimes useful to connect two routes. For this you have to select them both with the Command Cmd A on Mac or Control A on PC then you right click on the selection to open a drop-down menu and you select Join paths. Put the paths in order before validating.
![]() It's a good idea to print a map of your itinerary on paper. To do this select the path, then go to file and click print a map of the selected data. The printer releases an A4 format card with the north-south axis. This does not exempt you from taking the IGN card in the backpack.
It's a good idea to print a map of your itinerary on paper. To do this select the path, then go to file and click print a map of the selected data. The printer releases an A4 format card with the north-south axis. This does not exempt you from taking the IGN card in the backpack.
Getting started with Visu GPX
The software is free if you trace on the Open Cycle Map. Access to the IGN card is now charged about 10€ per year. However, you can still transfer the file to Skitrack to control it on IGN mapping.
Download here Visu GPX: www.visugpx.com
To make a journey:
- Select the card type on the right side of the card. In this case Open cycle map.
- After zooming in click on "Gpx Edit".
- Click on the "pencil" tool.
- The cursor represented by a small red circle is used to draw and move the map.
- To move the card continuously press the left side of the mouse and move it.
- At the end of the course make a double left click.Save the path by clicking on the tool located at the top right.
The GPX file is immediately downloaded. - If you have Basecamp, just go to the downloads and click on the file for it to load into the software. Watch the video.
Getting started with Skitrack
The free software allows you to trace directly on the IGN map. This software is very interesting for snowshoeing and ski touring since it indicates the slope areas of more than 30 ° IGN and Aster that can be checked or unchecked.
Download Skitrack here: www.skitrack.fr
The use is identical to that of Visu GPX. Just check "add a trace"before tracing with the "pencil" tool. You must then change the extension of the .txt file to .gpx to allow it to be imported into Basecamp.
Creating a custom map
It is possible to create your maps from a paper map or a digital map. The procedure can be quite long and complicated.
See the GARMIN map creation process: www.garmin.com
Use a GPS with a map
When using a GPS, you may need to know the GPS coordinates of a point identified on a map or, conversely, to identify on the map a point whose GPS coordinates you know.It is necessary for this to establish the correspondence between the different systems used on the maps and that used by the GPS. It is the GPS receiver that allows or not the change of reference system to adapt to the maps in use in France.
Determine the GPS coordinates of a point on a map
 To determine the GPS coordinates of a point on a map at the scale of 1:100,000 for example, it is necessary to apply the coordinate conversion formula given below:
*read the coordinates in grades using the primers appearing on the card, pay attention to the signed coordinates according to the position relative to the meridian ofParis;
*transform grades into decimal degrees (400 grades = 360°; 1 grade= 0.9°)
*transform decimal degrees into sexagesimal degrees (degrees, minutes, seconds)
*always add 2° 20'14,025" to the longitude obtained (offset between the meridians of Greenwich and Paris)
Plot GPS coordinates on a map
Depending on the complexity of your GPS, the coordinates read can be of four types:
1. in the ED50 system, in degrees, minutes and seconds. The corresponding latitudes and longitudes appear in italics, in the margin of the maps, outside, in sexagesimal degrees (ex: 47° 20'27").
2. in the ED50 system, in UTM kilometric plane coordinates. The kilometer coordinates appear in black in italics, on the outside, only the beginnings of the grid can read coordinates on the map (ex: 5247, 677).
3. in the NTF system, in grades. The coordinates in grades appear inside the frame in black, the lines in the map represent the meridians and parallels (ex:52,60 gr).
4. in the NTF system, in Lambert kilometre coordinates. The kilometer coordinates are also inside in the Lambert projection area in black or blue (ex:2265,373).
These four coordinate systems appear on the IGN maps at the scale of 1:25,000 and 1:50,000.


